
by Hanz Makmur – Sept 17, 2026.
In the past, we required anyone to print a single set of exam paper and duplicate it using our super-fast copier/printer at Hill 381, which has the essential staple option.
Note: This does not apply to users with a RAD-connected Windows machine, which can already print to the CS Hill3 printer with staple option.
With our new Papercut print release system, you can now print your exams from any CS Linux machine to the CS Hill3 printer in Hill 381. You can pick a One-sided or Two-Sided layout and finish every print with a ‘staple’ option.
Here are the steps.
- Make sure your exam is in PDF format. Example: exam.pdf.
- If the file is on your laptop, transfer it to your iLab Linux home directory.
Follow https://resources.cs.rutgers.edu/docs/file-storage/accessing-files-remotely/ if you don’t know how to transfer it. - Access a CS Linux machine via https://weblogin.cs.rutgers.edu
- Once logged in, find your file and double-click the ‘exam.pdf’ file to open it.
- Click the File menu and select Print. A print dialog box like the one below will open. If you don’t see the dialog box, you are probably printing from an app-specific dialog box. Click on ‘More Settings‘ and select ‘Print using system dialog’
- Under the General tab, pick ‘Hill3’ printer. This is the only printer you can use to print your exam because it is very fast and can staple every job.
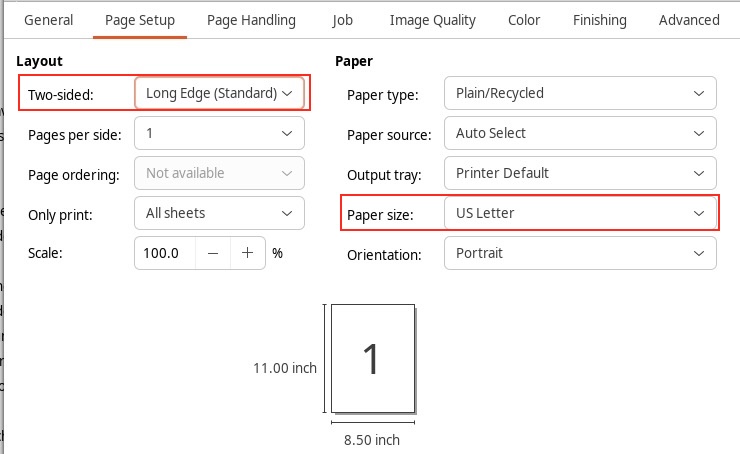
- Under Page Setup tab, pick your Layout. You can pick a One-sided or Two-Sided layout.
- Make sure you pick the correct Paper size. The printer has ‘US Letter’ size paper in its trays.
- If you want to staple your exams, click the “Finishing” tab to see the “Staple” option. For normal print, the “Top left” is the correct option.

- Print 1 copy of your exam to see if you did it right.
- Go to Hill 3 Print release in Hill 381, and release the job.
- If the print is correct, you can repeat the steps to print the remaining copies.
For help with our systems or immediate assistance, visit LCSR Operator at CoRE 235 or call 848-445-2443. Otherwise, see CS HelpDesk. Don’t forget to include your NetID along with descriptions of your problem.
