Running VMPlayer on CS Linux Machine
By Hanz Makmur Jan 2020 • Modified Aug 29, 2024
To enable users to learn how to set up and manage their operating system, we have made vmplayer available on all iLab Desktop Machines. (Note: Running vmplayer on iLabGPU servers is not currently supported.)
Note: You can also run VMPlayer on your personal computer for free. See VMware Software for info on how to download the software.
System Requirements
Running VMplayer
To run vmplayer, the user needs to use a GUI-based desktop. This can be done by sitting in front of the machine and running Microsoft Remote Desktop client to connect to any iLab Desktop machines from home. Once connected, open a terminal window and type :
vmplayer
Creating a New Virtual Machine.
/common/system/iso/ubuntu-18.04.3-desktop-amd64.iso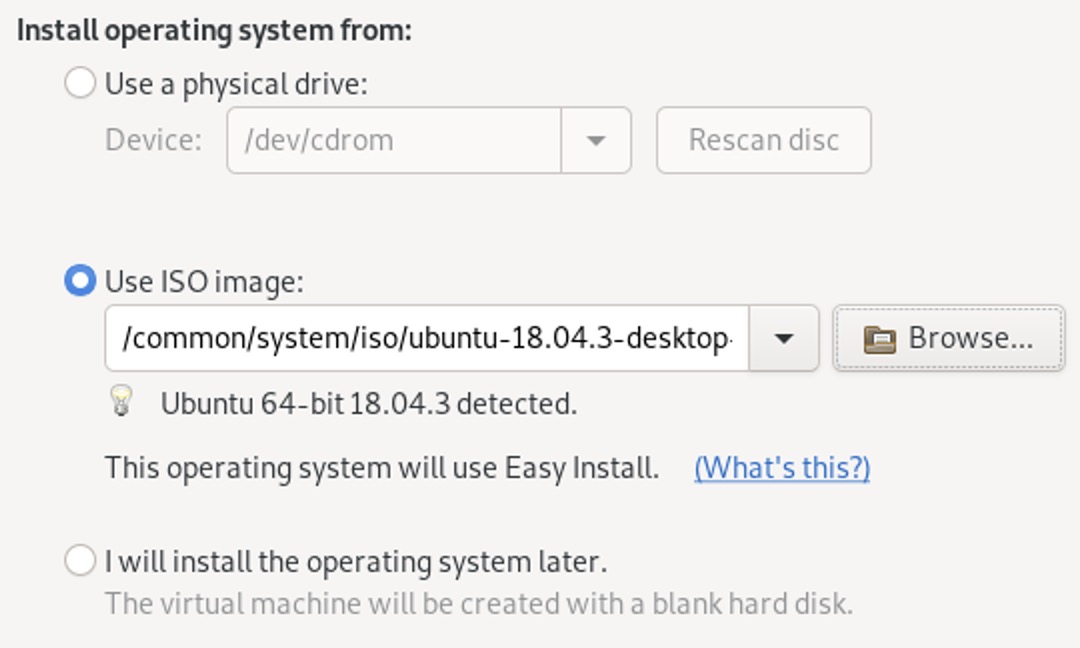
In the same iso folder, there is also a more recent Ubuntu 22.04 LTS /common/system/iso/ubuntu-22.04.2-desktop-amd64.iso and /common/system/iso/netboot.xyz.iso file, which allows you to use different OS and download on the fly. See details about what OS is available in URL: netboot.xyz/faq
After ISO selection, click Next until you see Customize Hardware. Click on this button to adjust memory and CPU. Disk size, etc.
We recommend a maximum of 8GB of memory, 25GB of disk, which should give you about 16GB of space to play with, and 2 CPUs for your VM. Click the Close and Finish button when done.
On Installation, skip the VMware Tool by clicking the Remind Me Later button. When the installation is done, your VM will automatically run. Don’t forget to edit the VM and remove the ISO image once you no longer need it.
Note: If you are installing a VM, Vmplayer will ask you to install VMWare tools. Skip this. This is not required and may fail during your VM installation.
Moving your Existing VMs to the Local Disk
This section is for existing users who have already stored VMs in their home directory. Skip this if you never run vmplayer before.
Some compatibility issues cause machines to crash during/after using vmplayer. We have narrowed this down to a problem related to NFS mounted home directory. To avoid this, store your VM on a local disk. Everyone can use Each iLab machine with fast local SSD-based storage /freespace/local/your_netid disk.
Note: you must use the same machine to do your work, and the local disk is not backed up. Data stored in a local disk does not count against your quota.
If you already have your VMs stored in your home directory, here is how you move it to the local disk.
#make a directory in /freespace/local under your netid
mkdir /freespace/local/$USER
#move your existing vmware folder to /freespace/local
mv ~/vmware /freespace/local/$USER
#create a soft link (alias) for the VMware folder so the player knows where the VMware folder is moved to.
ln -s /freespace/local/$USER/vmware
Possible issues
- Key mapping has been a long-time issues with VMPlayer. A solution recommended by VMWare is to create and add a line in
~/.vmware/configfile that says:xkeymap.nokeycodeMap = "TRUE"This can also be done by typing the following in the terminal window:echo 'xkeymap.nokeycodeMap = "TRUE"' >> ~/.vmware/config - If you have weirdness with ‘<‘ character when you use it with the Right but not with Left , map Right key to Left key by adding this line in
~/.vmware/configthat says:xkeymap.keycode.62 = 0xffe1
This can be also done by typing the following in terminal window:echo 'xkeymap.keycode.62 = 0xffe1'>> ~/.vmware/config
Please note that keysym ‘0xffe1‘ may be different for your keyboard. You can get this keysym when pressing Left key when runningxevin a terminal. - If you continue to have issues with other keys, please see VMWare and the fubar keyboard effect blog for more other options.
Reminder: Please SHUTDOWN the VM when you are not using it. All iLab machines are subject to enforced limitations.
